
How to enable cost explorer
Kapstan currently supports AWS and GCP for cloud cost observability. For each of them, the cost explorer enablement process is slightly different.
AWS Cost Explorer
Kapstan uses AWS cost APIs behind the scenes to compute the aggregated data corresponding to infrastructure resources provisioned through Kapstan. To achieve this we need certain permissions.
Pre-requisites:
User should have an AWS account and have following permission
- IAM permissions to enable Cost Explorer
- IAM permissions for enabling User defined cost allocation tags
Enable AWS cost explorer
This is a mandatory step as it tells AWS to start computing cost for your AWS account. If you have created a new AWS account, you'll need to do this step manually. For old accounts, this might already be enabled.
-
Open the AWS Cost Management console: Navigate to https://console.aws.amazon.com/cost-management/home in your web browser.
-
Choose Cost Explorer: Click on "Cost Explorer" in the navigation pane.
-
Launch Cost Explorer: On the "Welcome to Cost Explorer" page, click "Launch Cost Explorer."
-
Wait for data processing: Cost Explorer will begin processing your cost data. This may take a few minutes to several hours, depending on the amount of data.
Enable Kapstan cost allocation tags
If the role used to create AWS cloud connection with Kapstan has necessary permissions, Kapstan can enable these tags automatically
Kapstan adds specific AWS tags to all resources it provisions, allowing you to track associated costs effectively. For example, when provisioning a Kubernetes cluster, Kapstan creates several background AWS resources like EKS, EC2 instances, EBS volumes etc. To provide a consolidated cost view of each cluster we tag all the resources linked to a cluster with kapstan:resource_id tag.
For enabling cost observability of infrastructure provisioned with Kapstan in your AWS account we need to activate cost monitoring on certain tags.
-
Open the AWS Cost Management console: Navigate to https://console.aws.amazon.com/cost-management/home in your web browser.
-
Choose Cost Allocation Tags: Click on "Cost Allocation Tags" in the navigation pane.
-
Choose User-defined cost allocation tags: Click on "User-defined cost allocation tags", enter
kapstan:workspace_id&kapstan:resource_idtags in search and activate the Kapstan tags as shown below
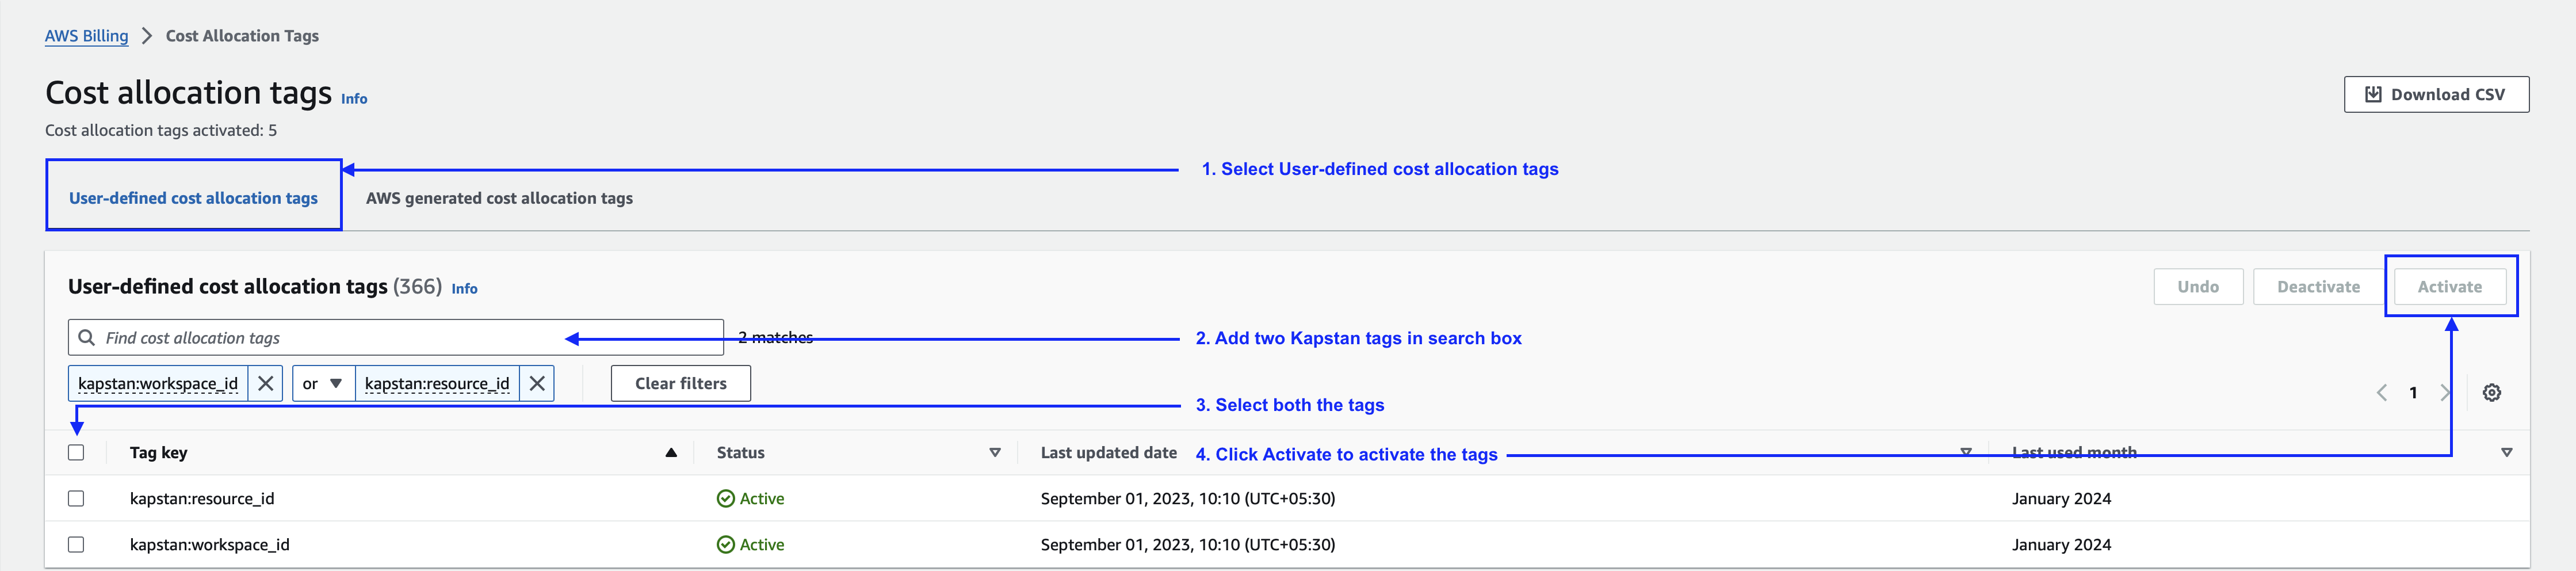
- Confirm the status becomes active: The
statuscolumn in the table should turn active.
It can take up to 24 hours for tags to appear in the AWS account after provisioning resources with Kapstan.
That's it, we are good to go.
GCP cost explorer
GCP Cost Explorer for Kapstan provisioned resources works in a slightly different manner. The user needs to perform certain operations before we can enable the cost explorer -
Pre-requisites:
User should have a GCP account with billing enabled and have the following permissions:
- Billing Account Administrator permissions to enable the Google Cloud Billing export
- BigQuery Admin permissions to access BigQuery
Kapstan does not support the cost tracking for Firestore database yet.
Enable cloud billing export to the BigQuery dataset
To enable your Cloud Billing usage cost or pricing data to be exported to BigQuery, do the following:
-
In the Google Cloud console, go to the Billing export page.
-
At the prompt, choose the Cloud Billing account for which you'd like to export billing data. The Billing export page opens for the selected billing account.
-
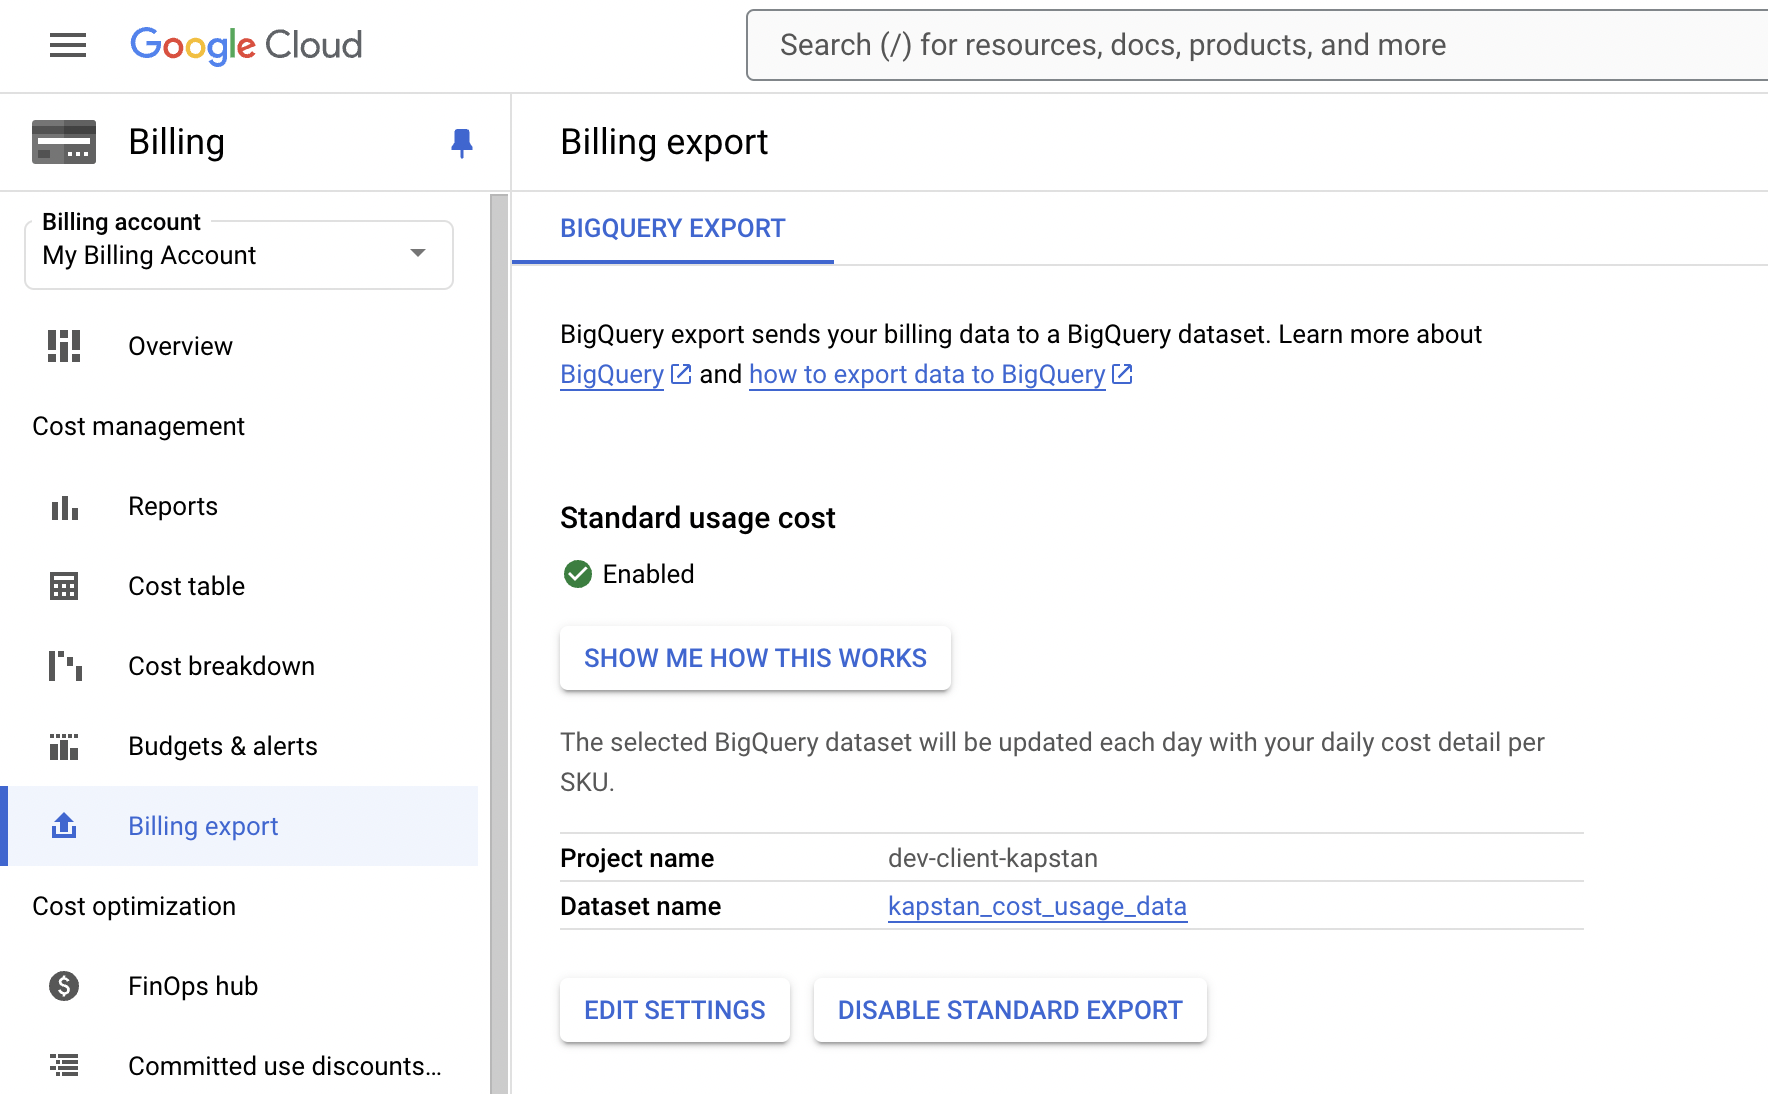
On the BigQuery export tab, click Edit settings for Standard usage cost data.
-
From the Projects list, select your project, it will be used to store the exported Cloud Billing data in the BigQuery dataset.
-
From the Dataset ID field, select the dataset -
kapstan_cost_usage_datathat was set up to contain your exported Cloud Billing data. For all types of Cloud Billing data exported to BigQuery, the following applies: The BigQuery API is required to export data to BigQuery. Kapstan enables the BigQuery API as part of the set up step. In case it is not, you are prompted to enable it. Click Enable BigQuery API to enable the API. Kapstan creates a BigQuery dataset namedkapstan_cost_usage_dataduring setup. In case it is not present, you are prompted to create one. If necessary, follow these steps to create a new dataset.
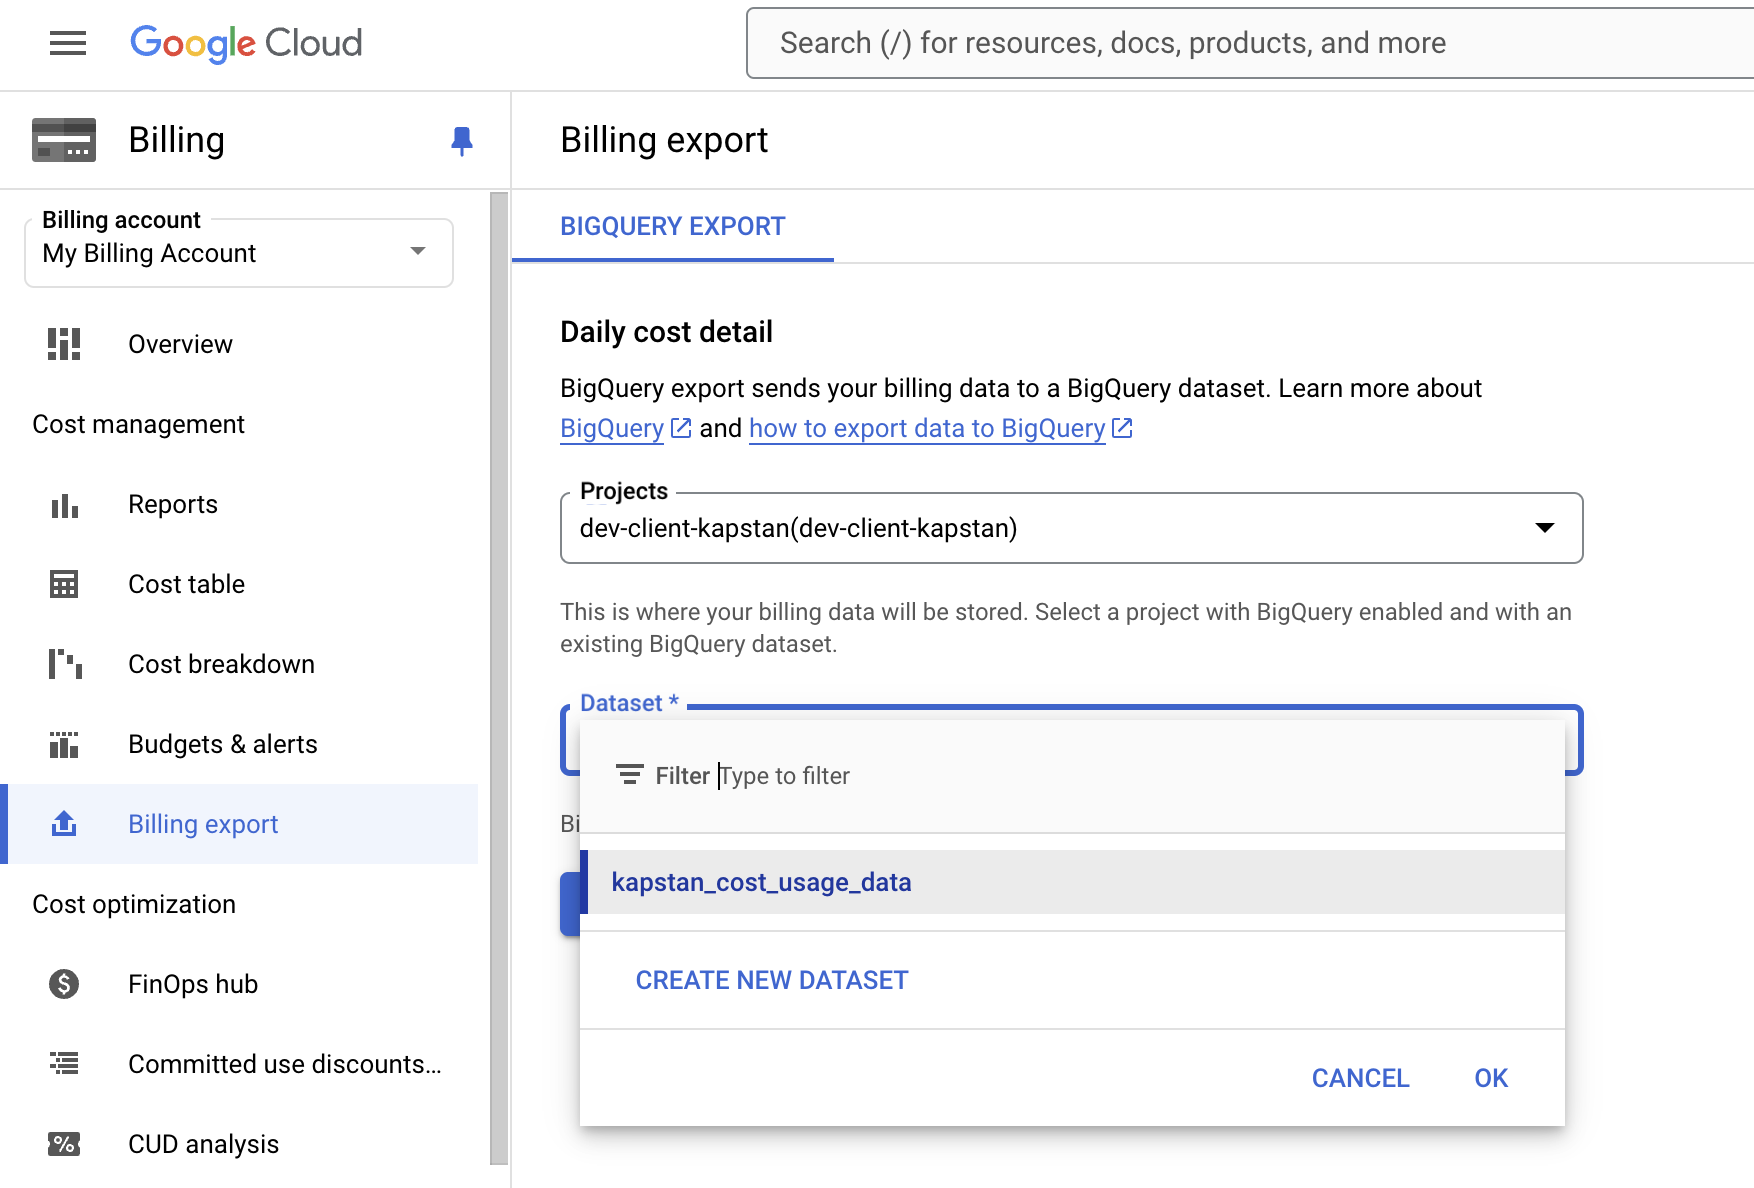
- Click Save.
That's it, we are good to go.
When you first enable the pricing export to BigQuery, it might take up to 48 hours to start seeing your Google Cloud pricing data.
